4 Tips to Build a Better Breakfast

It’s no secret that breakfast is my favorite meal of the day! I could literally eat it all day long.

What most people don’t realize is that many popular breakfast foods are loaded with sugar, processed foods and unnecessary ingredients.

Instead of relying on your breakfast to come from a box or the freezer (cringe!) build it yourself.

I promise that building your breakfast is more satisfying, more filling and tastes way better!

4 Tips to Build a Better Breakfast

  • Eat real food… no processed foods, no fast food, real whole foods and ingredients

  • Protein… clean lean protein to fuel your morning

  • Fiber… will keep you full and energized for the day ahead

  • Real sugar only… no added sugars, stick to fruit or a drizzle of honey at most

My current favorite breakfast is a yogurt bowl with coconut yogurt, fruit, hemp hearts, flaxseeds, chia seeds, and a drizzle of local honey!


My #1 Mom Hack for a Healthy Dinner

A massive headache took me out yesterday, and I was in no shape to make dinner or prepare anything…so take out it was!

As a Certified Nutritionist eating healthy is my thing, I love it, it makes me feel good, and keeps me healthy and energized so I can keep up with B…so I wasn’t about to sacrifice all of that just for a night of take out.

Luckily, a few months ago I discovered Crisp & Green which offers healthy salad bowls, warm bowls and smoothies! Literally all of my favorite things and makes life so much easier for me.

What can I say it has quickly become my #1 mom hack.

So last night we ran over to Crisp & Green to pick up an easy and healthy dinner!

My husband loves the fiesta bowl and I made my own bowl last night. We were able to have dinner with B, stay on track with our goals and bonus no dishes! I think this may need to be a weekly thing…

If you’ve tried Crisp & Green comment below and let me know what your favorite bowl is!?!


Tuscan Kale and Shrimp Wrap

My tuscan kale and shrimp wrap may sound fancy, but it’s easier than you may think!

Turns out it is possible to have a decedent lunch as a new mom.

This lunch literally look me 5 minutes to make, and I will definitely be adding this into my lunch rotation.

Ingredients:

Organic tuscan kale (2 cups/ 2 handfuls)

Wild caught shrimp (already cooked, deveined, and no shell) - serving size approx. 8 large shrimp, 16 small/medium shrimp

Avocado oil

Mayo / Vegan mayo / Olive oil

Salt and Pepper to taste

Quinoa wrap

Low sodium chicken broth


Directions:

Thaw shrimp in a bowl of room temp water.

Wash and trim kale, cook in a small pot on medium/low heat with 1 ounce of low sodium chicken broth and a dash of avocado oil.

Cook kale for approximately 3-4 minutes until it begins to wilt, then turn off the stove and remove it from heat.

Drain the water from your shrimp - be sure they are all thawed.

Place shrimp in a bowl and add 1 tsp of mayo / vegan mayo / olive oil (your choice!) to the shrimp. Sprinkle in salt and pepper to taste, and mix together.

Add kale to wrap and top with shrimp, and enjoy!

It’s really that simple.

On days that I’m covered in spit up, breastmilk…and let’s be honest who knows what else lunches like this bring me back to life and make me feel like an adult again.

This tuscan kale and shrimp wrap is loaded with fiber, protein, Vitamin A, Folate, ALA and Omega-3 fatty acids. It is sure to power you up and help you get through the afternoon!


Hope you enjoy!

3 of My Favorite Holiday Recipes

Sharing 3 of my favorite holiday recipes with you today!

Cinnamon Mashed Sweet Potatoes

Enjoy!! Happy Holidays! xxx

How to Make my Avocado Egg Sandwich

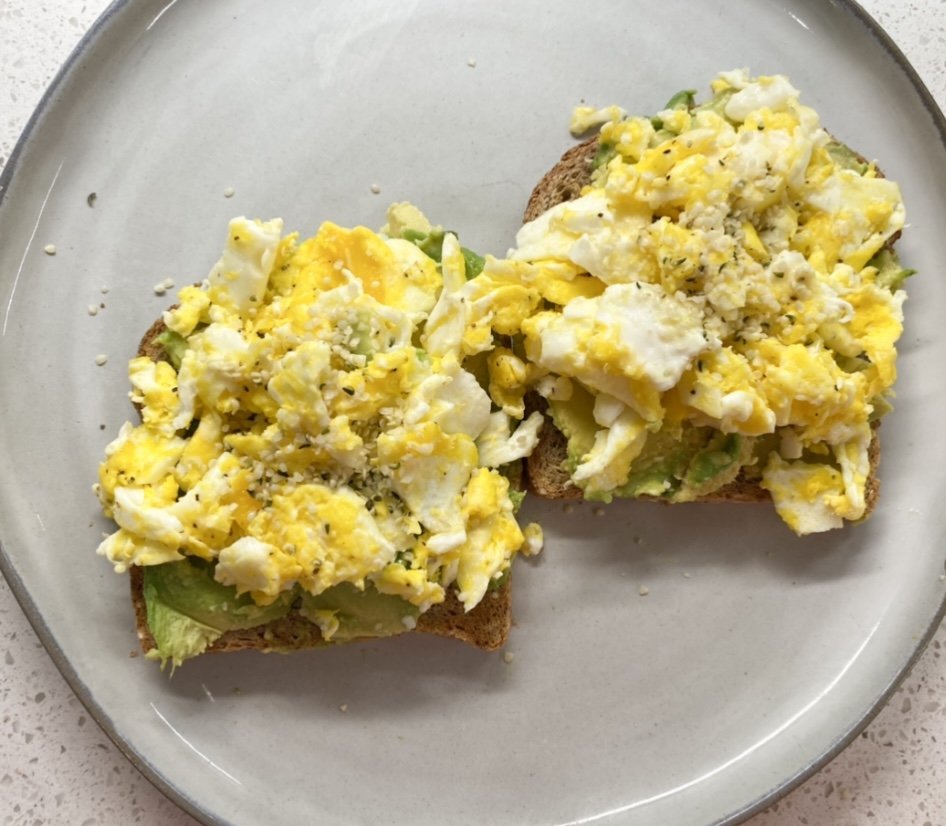
This has been my Husband’s go-to breakfast of late! It’s so yummy and such a great blend of healthy fat, fiber & protein I had to share the recipe with all of you!

We prefer to eat this sandwich open face, and it actually tricks the mind into thinking we’re eating more than we really are! The fiber and healthy fats from the avocado, along with the protein from the eggs will keep you fueled for a busy day ahead!

Avocado Egg Sandwich

Ingredients:

2 Slices of Ezekiel Bread (or bread of your choice)

1 Ripe Avocado

3 Eggs

1/2 Lemon

Manitoba Hemp Hearts

Salt & Pepper to taste


Directions:

Toast your bread, wash and prep avocado.

Using a spoon take the ripe insides out of the avocado shell (removing the seed) and place half on each piece of toast. Mash avocado on toast with a fork, then squeeze a bit of lemon on the avocado for brightness!

On medium-low heat cook 1 whole egg and 2 egg whites, until cook through. Stir often so eggs become fluffy and well scrambled.

Add scrambled eggs to avocado, half on each slice of toast.

Sprinkle hep hearts of top of your eggs, and add salt & pepper to taste if desired.

Enjoy!


20-minute Homemade Chicken Noodle Soup

As the temperatures begin to cool, and flu season quickly approaches I wanted to share my easy chicken noodle soup recipe!


Ingredients:

2 quarts - Low sodium chicken broth

1 bunch of organic celery

1/2 bag of organic baby carrots

1/2 bag of quinoa & brown rice pasta (or any noodle of your choice)

1 lb. organic ground chicken

Turmeric, salt, papper, and garlic to taste


Directions:

In a frying pan cook ground chicken on low heat until it reaches an internal temp of 165°.

In a large pot add both quarts of low sodium chicken broth and bring to a boil.

Wash, trim, and chop celery and carrots - then add to broth.

Once broth is boiling add in pasta, cook for approx 8 minutes (follow cook times for your specific pasta).

Once chicken is fully cooked, add to pot and stir.

Add spices to taste, and cook on low for approx 10 minutes.


Enjoy!!


Two Healthy Halloween Treats

Halloween treats tend to be loaded with sugar and dozens of unnecessary ingredients, so this year I’m sharing two of my favorite (healthy) halloween treats!

Bonus… your little ones will love making these with you!

TANGERINE PUMPKINS

INGREDIENTS:

  • 5 organic tangerines

  • 2 sticks of organic celery (with leaves)

DIRECTIONS:

  1. Peel the tangerine, and remove all of the white inner membrane of the peel that you can.

  2. Wash an dry the celery, then cut into 2 inch narrow pieces.

  3. Place celery inside the peeled tangerines.

  4. Use the celery tops as decor, arrange them on the tangerine to look like pumpkin leaves.

BANANA GHOSTS

INGREDIENTS:

  • 3 bananas

  • 3/4 cup vanilla yogurt

  • 12 mini chocolate kisses

  • 6 wood popsicle sticks

DIRECTIONS:

  1. Place wax paper over a baking pan. 

  2. Peel bananas and cut them in half lengthwise.

  3. Insert a popsicle stick into the cut end of each banana, pushing it halfway up.

  4. Place the vanilla yogurt in a bowl. 

  5. Hold the pops by the wooden stick, and roll each banana in the yogurt to fully coat the outside. 

  6. Allow excess to drip back into the bowl.

  7. Add 2 mini chocolate kisses to the top of your ghost (push pointy end of kisses into banana) - this will make the eyes of the ghost.

  8. Lay all bananas on baking pan, and place in the freezer for 3 hours to allow them to fully firm up.

  9. Remove the pops from the freezer, and use a butter knife to remove from the wax paper if needed. 

  10. Serve right away!

Dessert for breakfast, sign me up!

Ever since my son was born I’ve been sharing my oatmeal bowls on social media and you all have been loving them {turns out oatmeal is incredible for keeping your breastmilk supply up}!

I get countless messages about the type of oats I use {One Degree Organics is my favorite} and what I put in my oats to create a balanced breakfast bowl.

I have always been a big breakfast fan, and honestly I could eat breakfast any meal of the day!

Regardless of what I have for breakfast I always make sure it has a solid balance of healthy fats, protein and fiber to keep me fueled up for the day ahead {new mom life is non-stop}. I drink my greens as part of my morning routine, so I don’t worry about having any veggies with my breakfast.

  • Side note… did you know that fiber helps to offset the total carbohydrates in a dish? Say there are 40 grams of carbs and 20 grams of fiber per serving, you will end up with only 20 net carbs! Pretty neat, huh!

Okay, let’s dive into my current favorite oatmeal bowl {I actually just finished it as I’m writing this}.


Blueberry Protein Oatmeal Bowl

Ingredients:

One Degree Sprouted Quinoa Hemp Instant Oatmeal

Malk Almond Milk

Organic Blueberries (frozen is okay too!)

Organic Almond Butter

Vital Protein Collagen

Directions:

Bring 1/2 cup of almond milk to a boil on the stove, add approximately 1/3 cup of oats and stir.

Turn heat off and add 2 scoops of Vital Proteins Collagen, stir everything together.

Cover and let it sit for 2 minutes.

Add blueberries to the oat mixture and stir, let everything sit together for an additional minute.

Pour into a bowl and add a scoop of almond butter!

Enjoy!


This breakfast bowl is packed with 30 grams of protein to help fuel the day ahead!


My 4 biggest pregnancy cravings...

I’ve heard about pregnancy cravings my entire life, and most of the time they are strange out of the box type cravings that only a pregnant woman would understand. IYKYK

I thought it would be fun to share my top pregnancy cravings with all of you! As a Certified Holistic Nutritionist I try to always been very aware of what I eat and how it fuels my body and my energetics; that being said pregnancy is a whole new game and I wasn’t sure what to expect.

The first trimester I had more food aversions than food cravings. I have never been a big meat lover, which is odd because growing up family ate a ton of meat. This pregnancy, especially the first trimester, meat was such a trigger for me. In fact, I had to go upstairs while my husband cooked chicken because the smell made me so sick.

I didn’t really start to notice my cravings until I was well into my 2nd trimester. My biggest cravings have been… green juice (like 1-2 per day!), fresh cold fruit (blueberries, strawberries, apples, raspberries, blackberries…all of it), peanut butter (turns out you can put peanut butter on almost everything!), and coffee.

I was pleasantly surprised when I realized my body was naturally craving green juice and fresh fruit…what can I say baby is very on brand! lol These were both already a part of my diet, but the amount I am consuming of both have gone up tremendously. (and for those of you who think fruit is bad for you and your blood sugar…mine is the lowest it’s ever been…like ever.)

I feel like peanut butter is every pregnant woman’s craving. The amount that I have gone through this pregnancy is…well it’s a lot, let’s leave it there! I have been using peanut butter as a protein and a healthy fat for smoothies, oatmeal bowls, and so much more.

My last, and definitely my most surprising craving has been coffee. I was never a big coffee drinker, and pre-pregnancy only really drank it if I went out or on the weekends with my husband. Coffee has never been my thing…until now. I’m not sure if it’s the fact that I “can’t have it” / need to limit my caffeine that makes me want it or just the taste itself. I’m leaning towards the latter. I don’t crave it for the energy boost, but for the actual coffee taste. After talking to my Doctor’s and doing some research myself, I learned that my coffee craving is actually due to my anemia. Apparently when you are anemic you often crave coffee and the bitter flavor. This is why I will forever consider myself a student, always learning something new!

My take on pregnancy cravings is very similar to my take on cravings in general. I do not believe in restricting, especially because it can become a very unhealthy habit quickly. Instead I feel it is okay to give into your cravings, occasionally, and in healthy moderation. Sitting down with a box of cookies every night is not healthy moderation, but allowing yourself to have 1 small cookie a day or a few days a week is totally fine. When we restrict and forbid certain foods it can quickly become an issue, especially mentally, and frequently leads to binging on that food. Listen to your body, and see what it’s really asking for. For example, my body isn’t really asking for coffee it’s asking for more iron and heme, so that’s what I give it.

I’d love to know what your biggest pregnancy crave is or was?!? Comment below and let me know!

Photo By Jontel Chere

How to make easy Japanese soup recipe

My client shared this recipe with me years ago, and it’s still one of my favorites!

I have made a few modifications to make it Lean and Green Body® approved…but let me tell you it is still packed full of flavor and nutrients! This recipe is perfect for winter months, but is light enough to enjoy in the summer as well.

This is sure to be a crowd pleaser for the whole family!

Japanese Soup Recipe

Ingredients

 64 oz. of low sodium chicken broth, plus 32 oz. water (less or more to taste)

1-2 TBSP Bragg’s liquid aminos

1-2 inches of fresh ginger (or to taste)

1 can of sliced water chestnuts

1 package of fresh of Shitaki mushrooms

1/4 cup of sliced green onions (only the green part)

2-3 handfuls of spinach or bok choy

Mini wontons (optional, avoid if making soup gluten free)

Directions:

Bring broth, liquid aminos and ginger to boil. 

Add water chestnuts and green onions and simmer for about 5-10 min.

Add shiitake mushrooms, wait approximately 2-3 minutes and add dumplings if you are using them.

Add spinach or bok choy (if using bok choy you will need to cook a little longer).

Allow everything to simmer together on low/simmer for approximately 10-15 minutes.

Enjoy!

How to make my protein hot cocoa

There is something about cool winter months that has me craving a warm cup of cocoa. It’s cozy, sweet and very comforting. Growing up in Connecticut I remember many days sledding or skiing during the winter months and always running inside afterwards for some cocoa. It was always the best way to end the day!

However, the hot cocoa from my childhood is packed with artificial ingredients and loads of sugar. I knew this wasn’t an option for me (especially now that I’m pregnant) so I had to create one of my own!

This hot cocoa is high in protein, high in fiber, low in sugar and loaded with nutrients…and in my opinion tastes even creamier than the one from my childhood.

Lean and Green Body® Approved Hot Cocoa Recipe

Ingredients:

Coconut Cloud Hot Cocoa Mix

Oatly Oat Milk

Garden of Life Chocolate Raw Meal

Directions:

Steam one cup of oatly oat milk, then add 1 scoop of Garden of Life Raw Meal - shake or blend together.

Add 1 scoop of Coconut Cloud Hot Cocoa mix, and enjoy!

The Coconut Cloud Cocoa mix is a great product, and is vegan, gluten free and contains MCT oil. I like to mix it with the Garden of Life Raw Meal to add protein, fiber and essential nutrients to the cocoa. Even though the cocoa mix is relatively low in sugar, by adding protein and fiber to the drink you are assisting your body in the absorption of the sugar and helping to prevent a big sugar crash after your cocoa.

This combo also makes the drink super creamy! It has been my drink of choice the past few weeks.

Hope you enjoy!

Stay cozy friends. xxx

  • this blog post contains affiliate links, if you purchase from these link I will make a small commission off the purchase. Thank you for helping to support my small business.

  • this blog post is in a no way affiliate with or sponsored by the above companies.

How to energize your day!

The Lean and Green Body® Triple Play is my favorite way to start my day!

If I happen to miss a day I feel sluggish, fatigued and even dirty inside…my body literally craves this routine every day.

If we haven’t worked together yet, I’m about to let you in on one of my trade secrets!

The Lean and Green Body® Triple Play is a sure fire way to energize your body, gently detox your system, and flood your body with nutrients all before you’ve even had your morning coffee.

My coveted Triple Play morning routine is something I typically share with my nutrition clients during our first or second appointments, and now you can experience all the benefits too!

The Lean and Green Body® Triple Play is my morning routine…let’s break it down!

First thing in the morning when you wake up…before you put anything else into your body, drink these three things…

First, 8 oz of room temperature water with the juice from 1/2 an organic lemon…sip it!

Then, add 1-2 TBSP of Bragg’s Apple Cider Vinegar to 4-8 oz of water (you MUST add to water, do not drink ACV on it’s own)…drink it down!

Followed by, our morning greens! My current favorite greens are the Amazing Grass greens OR the Garden of Life Perfect Food Raw Greens. I love both of these brands and rotate between the two! You’ll mix one scoop of your greens with 8-10 oz of cold water (I like to use a blender bottle), shake and drink!

Then you can have your coffee and breakfast!

So why do I encourage you to drink all that first thing?!? Let me fill you in on what each drink does…

Each morning we wake up and our bodies are so dehydrated from working on overdrive while we sleep. The room temperature water with an organic lemon works to rehydrates your cells, energizes your body, and helps to pull out toxins. I get this question almost daily…and yes, it’s essential that the lemon is organic! An organic lemon is alkalizing, where a conventional lemon is acidic. This was literally mind blowing the first time I heard this...a food is either alkalizing or acidic based off what it does inside our body. A conventional lemon will never be alkalizing because of the pesticides and chemicals sprayed on it…sorry but you can’t wash them off. The lemon water responds almost like coffee to the body, and provides a boost of energy without the jittery feeling associated with caffeine.

Next up, the Apple Cider Vinegar comes in to helps neutralize the body. When we wake up our bodies are in an acidic state, the Apple Cider Vinegar helps to increase the pH of the body creating a more alkalizing state. We want to keep our bodies in an alkalizing state as much as we can since this is an undesirable place for cancer, disease and illness to thrive in. (Disease thrives in an acidic environment.) Apple Cider Vinegar, Bragg’s particularly, is one of my favorite holistic remedies because it performs hundreds of benefits to the body. Just be sure to mix it with water, and never drink it straight. (do not take ACV if you have an ulcer or symptoms of an ulcer)

We round up our Triple Play with our greens! Probably my favorite part of the Triple Play. Both of the green supplements I recommended above contain approximately 34 raw greens that have been juiced first and then dried. This is very important because we are not cows, and it can be very difficult for our bodies to digest and breakdown grass and some greens. Having the greens juiced first helps our bodies assimilate and utilize the greens and nutrients much easier. You will mix your greens with about 8-10 oz of cold water, I like to use my blender bottle and shake them up! When you drink your greens on an empty stomach (no food) you allow the nutrients to be absorbed and utilized by the body right away, it takes away to need to digest them and this giving your digestive system a break. Greens will help to boost your immune system, keep you energized, gentle detox the body, and help to balance blood sugar levels!

That’s it! It may seem like A LOT at first, but I promise it gets easier and eventually it just becomes part of your morning!

My husband and I love to travel and I always bring all 3 parts of this morning routine with me when we travel. To read more about my travel tips click HERE

As a Certified Holistic Nutritionist I am very cognizant of what I put into my body, what I give my family and what I recommend to my clients. I do extension research on all products I recommend, but I always recommend doing your own research to see what you feel comfortable with.

Gentle reminder…you should always consult your Naturopathic MD or Certified Nutritionist before adding a supplement to your routine. If you are pregnant or nursing I would recommend eliminating the ACV portion of the morning routine, and simply doing lemon water and greens!

To learn more or to work with me, please email me at jennifer@leanandgreenbody.com

Photo By Jontel Chere

How to Make my Blistered Potatoes!

I love potatoes, definitely one of my top 5 favorite foods! I am always experimenting with new ways to enjoy this nutrient dense veggie. I recently made blistered potatoes…which is really just another way to say roasted! lol

Blistered Potatoes

Ingredients:

one bag of gold baby potatoes

pink himalayan sea salt

pepper

avocado oil


Directions:

wash and trim potatoes

pre-heat convection oven to 425°F

add potatoes into oven safe dish, drizzle avocado oil, and sprinkle salt & pepper to taste

bake for 15 minutes then flip them over, bake for an additional 20 minutes

allow to cool and enjoy!


How to choose the right prenatal vitamin

Choosing the right prenatal vitamin can be overwhelming! With so many options, how do you know which one is best for you and your baby?

My first recommendation would be to meet with your Doctor or Naturopathic Physician and get a full blood panel done, this will show you were you are deficient, or borderline, and this will tell you where you really need to focus.

I would also recommend not only checking your folate, but checking to see if you carry the MTHFR gene. The MTHFR gene, also called methylenetetrahydrofolate reductase, is responsible for processing amino acids and is very involved in the creation, absorption and utilization of Vitamin B9 (folate). Folate is essential for your baby’s development, so if you do carry the MTHFR gene don’t panic, your Doctor will most likely put you on a prescription folate, like Metanx which conatins L-methylfolate, methylcobalamin and pyridoxal 5'-phosphate. This would be something you would need to take in addition to your prenatal vitamin.

When selecting your prenatal vitamin I would highly recommend researching the company first, unfortunately not all supplement companies are created equal. Since supplements are still not regulated by the FDA the percentage of vitamins and minerals actually in the supplement can vary. I do extensive research on all supplement companies I personally take, give to my family and recommend to my clients. As always I encourage you do to your own research and see what you feel comfortable with.

My favorite brand of prenatal vitamins is Pure Encapsulations. I actually take a few of their products, and really trust this brand. I have been taking this prenatal since before I was actually pregnant to prepare my body.

I would recommend starting your prenatal vitamin about 6 months before you actually plan on conceiving. This is also a good time to get your blood work done, and ensure that you are aware of all underlying conditions.

I have talked about this many times, but I was very sick from week 10-16 and could not take this prenatal vitamin, so I had to make a switch to a gummy vitamin. In truth, gummy vitamins are not my favorite especially as a Certified Nutritionist but I was desperate to get some vitamins in my system. During these 6 weeks I took the Olly Prenatal Vitamin, and actually liked it quite a bit. These type of vitamins are much easier on the stomach and do not tend to cause as much nausea.

A few other brands worth checking out would be Thorne and Garden of Life.

A few things to look at when selecting your prenatal vitamin:

  • serving size - how many pills will you need to take daily?

  • how large are the pills? Are the reasonable for first trimester?

  • avoid herbs in your prenatal (many will cause uterine contractions and miscarriage)

  • read the nutrition label and compare it to your blood work - will this work for you specifically?

Your prenatal should include folic acid and iron, in addition to a few other important vitamins: Vitamin A, B-Vitamins, Vitamin-C, Vitamin D, Vitamin E, Zinc, Calcium and Iodine. The dose of each of these vitamins and minerals will vary depending on your specific needs.

Remember that the Standard American Diet does not obtain enough of these vitamins from diet alone, which is why a supplement is essential.


How to Get More Omega-3's in Your Diet

Omega 3’s are a super important part of our diet & supplement routine.


The Standard American Diet (SAD) is crazy high in omega 6’s, which are pro-inflammatory. Most of these omega 6’s are coming from arachidonic acid in conventional meats and meat products. The Standard American Diet ratio is 10:1 to 30:1 omega 6 to omega 3… insane?!?

To put it in perspective a healthy ratio of omega 6 to omega 3 is 1:1 to 5:1. This type of ratio will help to prevent heart disease, help create healthy cholesterol levels, lower inflammation and so much more!

We need omega-6’s too, just not in such high quantities. Omega-6’s are helpful to create inflammation and protect the body especially when injured. I have yet to meet anyone who did not obtain enough omega-6’s in their diet, which is why the focus is on omega-3’s. Most Americans are overburdened with inflammation, which can lead to disease and illness. By focusing on an anti-inflammatory diet and lifestyle we are lowering the inflammation naturally, making our bodies a less desirable place for disease and illness.

A few ways to add more omega-3’s into your diet are:

Fish (mackerel, salmon, sardines and herring are all especially high in omega-3’s)

Cod Liver Oil

Oysters

Flaxseeds

Chia seeds

Walnuts

Still worried you aren’t getting enough omega-3’s in your diet, supplementation can be a great tool!

Since becoming pregnant I have learned that omega-3’s are even more important, especially for my growing baby. I encourage you all to check in with your diet, and make sure you are getting enough omega-3’s from the foods you eat…if not check out a few of my favorites ways to supplement below!

Here are a few of my favorite omega-3 supplements:

You’ll notice that I included two pill and two liquid supplements, as well as a variety of dosages. Always consults your Certified Nutritionist or Naturopathic Physician before starting a new supplement.

To shop all my favorite supplements click HERE

How to Make Pecan Pie Energy Balls

One of my girlfriends recently brought these pecan pie energy balls over, and I’ve been dying to share this recipe with you! This is the perfect afternoon snack, a great playground snack for the littles, or even a sweet treat post dinner.

Dates are packed with phytonutrients, magnesium, selenium, and potassium and make a great addition to almost any diet.

Depending on the size of the energy balls you make, I would recommend limiting the portion to 2 per day.

Pecan Pie Energy Balls

Ingredients:

Medjool dates

Raw Pecans

Old Fashioned Rolled Oats

Vanilla Extract

Graham Crackers

Kosher Salt

Directions:

Place graham crackers into the food processor and blend until they turn into crumbs, remove from food processor and put in a bowl.

Remove the pits from the dates, and add pitted dates to the food processor. Blend until they become paste- like.

Add the remaining ingredients to the food processor and pulse until all ingredients come together.

Remove the ingredients and form small balls, you can use a tablespoon to do this. Place formed balls on a platter, and continue until you use all the ingredients in food processor.

Roll each ball into the graham cracker crust, so it is evenly coated.

Enjoy the pecan pie energy balls now or store in fridge or freezer for later!

{exclude graham crackers if making gluten free}

Original recipe from: www.fitfoodiefinds.com

LIVE Cooking Class Recap

Last week I held my first ever live virtual cooking class for my Wellness Bestie Members! It was so fun, and I already can’t wait for the next one.

I loved sharing my kitchen and my recipes with the Wellness Bestie group. We were able to modify the recipes to meet everyone’s dietary needs and requirements, and they all turned out great!

For this event we made one of my favorite holiday appetizers and a matching cocktail (or mocktail)!

We had so much fun that I have decided to host another LIVE virtual cooking class in December!

One thing I love about running a business that is 90% virtual is that I get to work with women all over the country! So regardless of where you live, I hope you’ll join us in December for our next cooking class.

Click here to learn more about the Wellness Bestie Membership and to sign up!

How to Make the Perfect Brown Rice

Brown rice is a staple in our house. It’s hypoallergenic, anti-inflammatory, and when combined with beans it makes a complete protein.

It took us a while to master the perfect brown rice, so I thought I would save you all the experimenting (and bad rice) and just give you the perfect brown rice recipe!

For this recipe you will need a pressure cooker, here is one of my favorites!


Ingredients:

2 cups organic brown rice

2 3/4 cups water

1 TBSP of avocado oil

Pink Himalayan Sea salt (to taste)


Directions:

Wash rice thoroughly, and add all ingredients to pressure cooker.

Pressure cook high for 22 minutes, then allow to sit for additional 20 minutes.

Enjoy!

This recipe makes approx 6 servings.

How to Get Back on Track After Halloween

The day after Halloween can be as painful as New Years Day for some.

A sugar hangover can be as intense as an actual hangover.

Okay, so maybe you’re thinking you didn’t go trick or treating this doesn’t apply to me…but chances are you either handed out candy and swiped a few for yourself OR you helped your kids out by “organizing” their candy after they went to bed. No judgement for either way, but chances are you probably consumed more sugar last night than your body is used to and you’re likely not feeling 100% today.

Brain fog, fatigue, headaches, irritable?? Any of these sound familiar?

The best thing you can do after too much sugar is hydrate! Aim for your 100 oz of clean water today to help flush out the sugar and other toxins from the candy.

Focus your meals today on protein and fiber. Sugar is a drug, so when we consume sugar our body just wants more and more. Focusing your diet on protein and fiber today will help to balance out your blood sugar levels and fight cravings.

Perhaps your trick or treating looked more like cocktails with friends… same rules apply!

Hydrate and focus on protein & fiber!

You’ll be back on track in no time.

How to Make Spaghetti Squash

Spaghetti Squash

Ingredients:

1 medium to large spaghetti squash

3 tablespoons of extra virgin olive oil

2 tablespoons toasted pine nuts [ warm in a pan until golden ]

3 tablespoons Italian parmesan cheese (optional)

1 tablespoon shredded fresh basil

1/2 Meyer lemon

Sea salt and pepper to taste


Directions:

Fill a large pot with water. Add a dash of salt to water.

Cut squash in half with a serrated knife and remove seed portion. Add to water. 

Boil and cook until fork tender (about an hour)

Check the squash frequently. Allow to cool enough to handle. 

Use a fork going to lengthwise, scrape entire squash until you’re left with just the skin. Discard skin. 

While still warm, add cheese and salt/pepper and toss. 

Warm in a sauté pan on the stove top. 

Cook pine nuts stove top on low heat for seven minutes. 

Add nuts, a dash more cheese & fresh basil on top of spaghetti squash.

Squeeze lemon.

spaghettisquash.jpg